VWC meaning: how to set soil moisture thresholds for irrigation
A soil moisture sensor gives you a number, for example 27% VWC. On its own, that number says little. It only becomes useful once you know what “full”, “ideal” and “too dry” mean in your soil, for your trees and at that point in the season.
This article explains what volumetric water content is, how accurately you can measure it and how to derive irrigation thresholds from it. We use the orchard (apple, pear, cherry) as an example, but the method applies to any crop you manage with a soil moisture sensor.
What does VWC mean (volumetric water content)?
VWC stands for volumetric water content: the share of a volume of soil that consists of water, expressed as a percentage (%VWC). It is the standard measure of soil moisture in crop production.
30% VWC means that 30% of a given volume of soil is water. The remaining 70% is soil particles and air.
A soil moisture sensor (or soil moisture meter) therefore measures how much water is in its measuring zone, relative to the volume of soil around the sensor. The difference with a tensiometer: a tensiometer does not measure how much water there is, but how tightly the soil holds on to it (the soil water tension, expressed in kPa or as a pF value).
From measurement signal to volumetric water content
A sensor does not measure water content directly. It works in two steps:
- The sensor measures a physical property of the soil that is closely related to the amount of water, usually the dielectric permittivity.
- A calibration formula converts that measurement into a %VWC.
This conversion is often done with the Topp equation, an empirical relationship that gives usable results for many mineral soils. It remains an approximation, though: the formula assumes an “average” soil.
How accurate is a VWC measurement?
Cheap sensors for vegetable gardens or flower pots give an indication, but they already measure the physical property itself inaccurately. To manage a professional crop, you need a sensor that measures water content objectively and repeatably.
Even with a good sensor, the standard calibration falls short in soils with a lot of organic matter (more than about 5%), very heavy clay (more than about 20% clay fraction, because of the water bound to the clay particles), volcanic soils and at high salinity. There, the sensor typically overestimates the water content: the soil looks wetter than it is.
- Heavy clay: with a clay fraction above 20 to 30%, the deviation can reach 5 to 10%. Most clay soils in Flanders stay below that threshold.
- Salt: brackish irrigation water or intensive substrate cultivation can cause 5 to 15% overestimation. Sensors based on TDR or TDT are less affected, and some correct themselves by also measuring the salt concentration.
A systematic error matters less than you think
“Research into techniques for measuring soil moisture has been going on for 40 years. There is still no system available that measures correctly and keeps measuring well over a long period.”
That is why we take a pragmatic approach. The question is not “is the measurement right?”, but “what do I decide based on that measurement?”
These errors are systematic. If your sensor reads 6% too high in heavy clay, every reading is 6% too high. The shape of the curve, the response to an irrigation event and the decline due to water use remain correct.
Whether that is a problem depends on how you use the measurement:
- You follow a general reference value, such as “keep soil moisture around 25%”? Then every percent of error counts, and you need to take a critical look at your calibration.
- You compare measurements across years or between fields? Then you need to measure as accurately as possible.
- You set thresholds in your own field, with your own sensor? Then a systematic error largely cancels out, because your anchor points are measured with the same error. That is the approach in the rest of this article.
Over time, sensors can also drift or lose contact with the soil. How to spot that in the data is explained in How do you know whether your soil moisture sensor is still measuring correctly?.
The same %VWC, a different story for the tree
The key insight for what follows: the same %VWC does not mean the same thing for the plant in every soil. A sandy soil at 18% VWC can already be bone dry for the tree, while a clay soil at 18% still releases water easily. Clay holds water more tightly, and roots can never extract part of it.
That is why there is no fixed reference value for “good” soil moisture. You need thresholds that belong to your soil.
Three anchor points: field capacity, wilting point and refill point
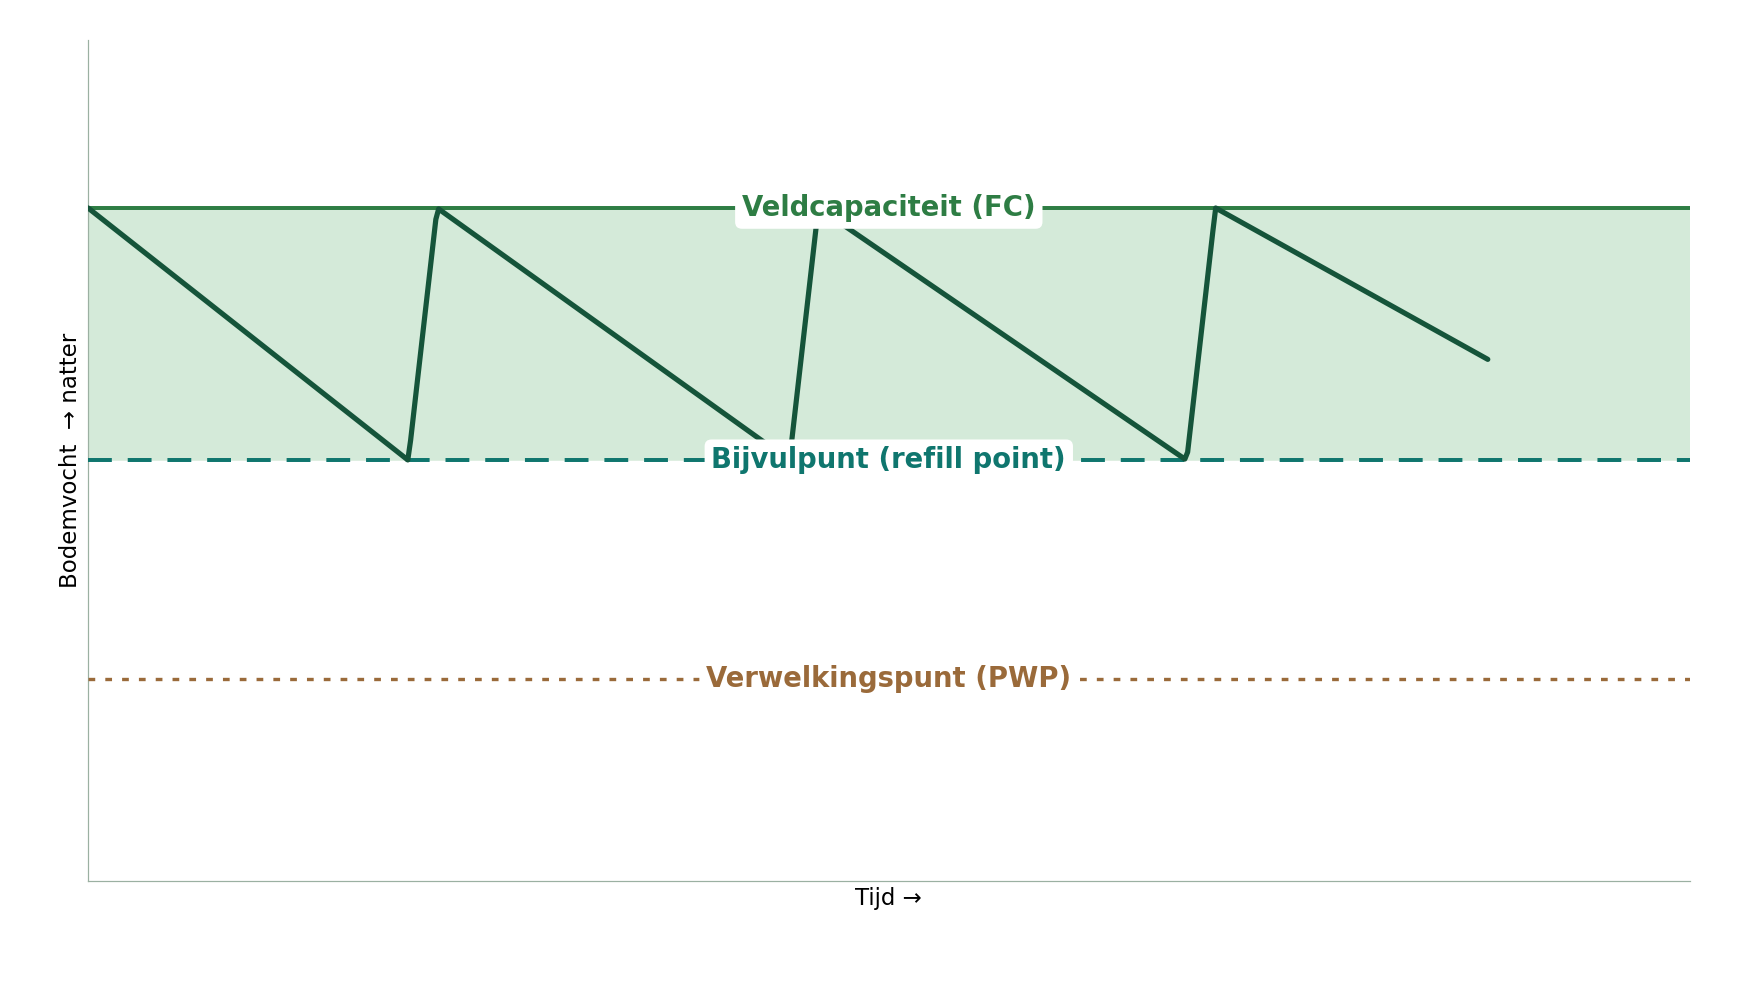
1. Field capacity (FC): the upper limit
Field capacity is the water content that remains after gravity has drained away the excess water, roughly at pF 2 to 2.5. Anything above it drains away or displaces the air in the soil, with a risk of oxygen shortage at the roots. That risk is very real in lower-lying, wetter spots of a field.
2. Wilting point (PWP): the lower limit
The permanent wilting point is the water content below which the tree can no longer draw water from the soil, at a soil water tension of −1.5 MPa (pF 4.2). The water still left in the soil at that point is out of reach for the plant.
3. Refill point: the moment to irrigate
Between field capacity and wilting point lies the plant-available water (available water capacity, AWC). You do not let the soil dry out to the wilting point, because by then the tree has long been under stress. You step in earlier, at the refill point.
How much of the available water you allow to be used up is called the management allowable depletion (MAD). For most crops it lies between 30 and 50%. For apple, pear and cherry, the FAO guideline gives 50%.
Refill point (%VWC) = field capacity − MAD × (field capacity − wilting point)
Worked example. Field capacity 32% VWC, wilting point 14% VWC. The available water is 32 − 14 = 18 percentage points. With a MAD of 50%, you let 9 percentage points of that dry out. Your refill point is therefore 32 − 9 = 23% VWC, and your target zone runs from 23% (irrigate) to 32% (full, no higher).
You do not have to guess these thresholds: you can determine two of the three anchor points in your own field.
How to determine the thresholds in your own field
Measuring field capacity yourself
This is the most practical and reliable calibration, and all you need is your sensor.
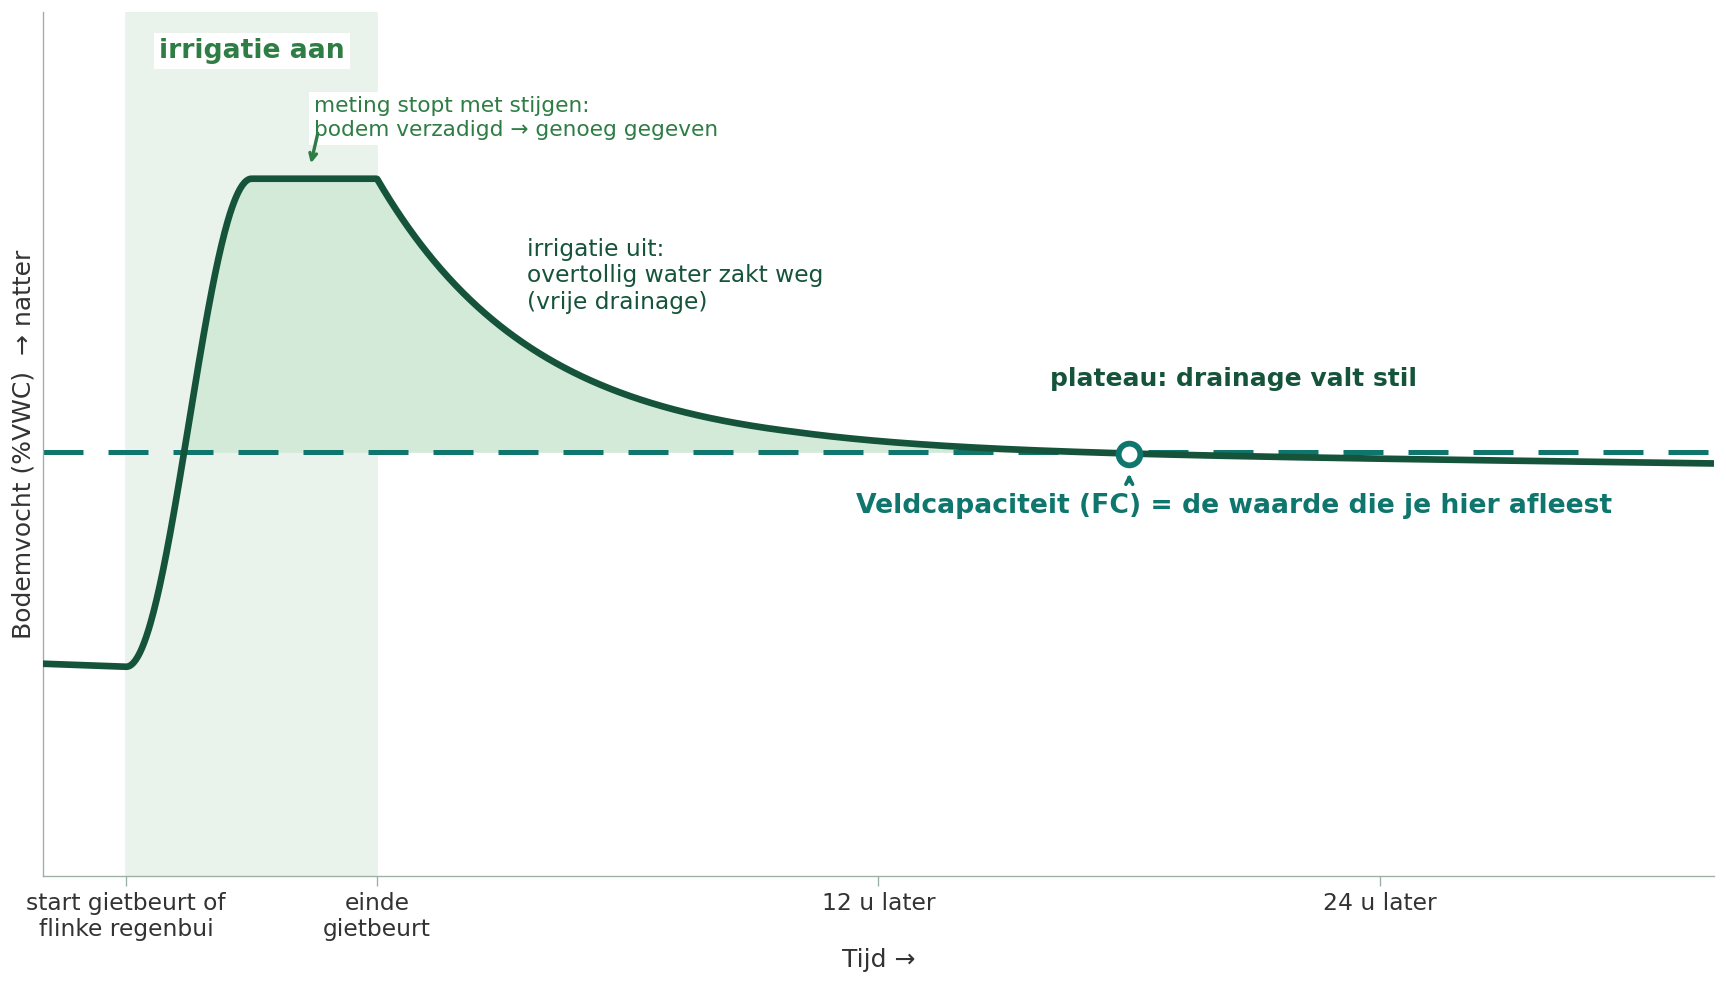
- Early in the season (or after installation), apply a heavy irrigation or wait for a substantial rain shower, so the soil around the sensor becomes saturated.
- Let gravity do its work and read the sensor 12 to 24 hours later, preferably in the morning. On heavier soils (loam, clay), drainage is slower and this can take 2 to 3 days.
- The value on the plateau is your field capacity for that depth.
Do this separately for each measuring depth: even within the same field, values differ between layers.
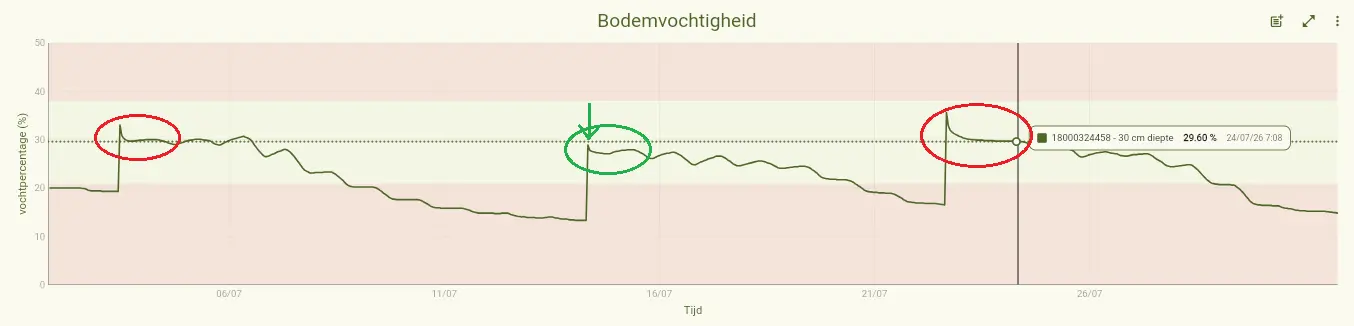
What does that look like in practice? The irrigation events circled in red in the chart below show the level of field capacity. The irrigation circled in green was not enough to reach field capacity.
Wilting point from a soil analysis
You cannot measure the wilting point in the field without putting your trees under stress. The standard approach starts from a soil sample that you send to a lab. There are two routes:
- Measuring water retention: the lab uses a pressure plate or pF method to determine how much water the soil still holds at pF 4.2. That gives you the wilting point of exactly that soil.
- Deriving it from the texture: a texture analysis gives the sand, silt and clay fractions. With those, you look up a table or pedotransfer value in a soil database.
The first route is more accurate, the second faster and cheaper. For most practical situations, a good field capacity measurement plus a table value for the wilting point is enough to set a workable refill point.
Determining the stress point with a dendrometer
If there is also a dendrometer at the same location, you can approach the lower limit from the tree instead of from the soil. A dendrometer does not give you the soil physics constant of −1.5 MPa, but it does give you the %VWC at which this tree in this soil actually starts to show stress. In practice, that is the lower limit that matters.
To do this, read the soil moisture sensor and the dendrometer together over a few drying cycles. The early stress signals of the trunk (an increasing maximum daily shrinkage, a rising tree water deficit and leveling-off growth) show when the tree starts to feel the shortage. The %VWC at that moment is your tree-validated stress point. Why the trunk shows this so early is explained in Why dendrometry reveals water stress.
The biggest gain is in the refill point. Set it with a margin above that stress point, to absorb the response time of your irrigation, and you have replaced the theoretical refill point of 50% MAD with a measured value for your field. Then adjust it for each phenological stage: tighter during cell division and fruit growth, looser where a controlled deficit does no harm. These insights are essential when applying regulated deficit irrigation.
Keep in mind: the dendrometer signal also depends on the weather (the evaporative demand or VPD), the crop load and the day-night rhythm. Work with reference trees and look at the trend over several days, not at individual readings. The soil sensor tells you how much water is in the soil, the dendrometer whether the tree is suffering from it. Together, they sharpen your thresholds.
Why thresholds differ by soil type
A sensor that measures %VWC correctly does not need to be recalibrated for each soil type. Your thresholds do, because the three anchor points shift with the texture. Coarser soils (sand) hold less water than finer soils such as loam and clay.
| Soil type | Field capacity | Wilting point | What it means |
|---|---|---|---|
| Sand | ± 10–18% VWC | ± 3–8% VWC | Narrow window and fast drying. Thresholds are low and close together: irrigate more often and in smaller amounts. |
| Loam / sandy loam | ± 25–32% VWC | ± 10–15% VWC | Wider window and slower drying. Comfortable to manage. |
| Clay | ± 35–45% VWC | ± 20–28% VWC | A lot of water, but much of it is bound. Watch out for saturation and oxygen shortage: the upper limit matters as much as the lower limit here. |
Indicative values. Use them to check your own measurements, not to replace them.
If you have fields with different soil types, one set of thresholds for the whole orchard is wrong. There are two common strategies for placing your sensor:
- In the most representative soil of the irrigation block, if you want to manage on average and save water.
- In the fastest-drying zone, if no tree may experience stress. The rest will get water in time anyway.
On sloping fields this matters even more: lower-lying trees stay wetter (risk of saturation), higher trees dry out faster. In that case, measure in both the highest and the lowest part of the block.
At what depth do you measure soil moisture?
For fruit trees, one measuring point is not enough. Each soil layer tells you something different.
- Root distribution: tree roots sometimes go meters deep, but in a mature tree almost all root mass is in the top 60 to 90 cm. That is where water uptake happens.
- Measuring depths: measure from just below the tilled or grass layer (10 to 15 cm) down to about 70% of the effective root depth. A common setup measures at 30, 60 and 90 cm. A rule of thumb is to measure at one third and two thirds of the root zone.
- What each depth tells you: the top sensor responds quickly to irrigation and evaporation (the working zone). The middle one sits where most active roots are (your control zone). The deepest shows whether water drains below the roots. If it rises after every irrigation, you are irrigating too heavily and flushing water and fertilizer past the root zone.
- Position relative to tree and dripper: under the drip line, in the zone where the roots take up water most actively, at a representative distance from tree and dripper. Avoid disturbed spots such as old planting holes, backfilled zones, ridges or hollows.
A sensor that measures several depths in one probe makes that setup simpler. See our multi-depth soil moisture sensor.
Dead time: why your sensor responds later than you expect
When you irrigate or it rains, you do not see it on the sensor right away. There is a delay between the moment water reaches the surface and the moment it reaches the sensor at depth. We call that the dead time.
How long is that delay?
It depends on the measuring depth, the soil texture and how dry the soil was. An example from a peach orchard: with a four-hour irrigation on a fairly dry topsoil, the sensor at 30 cm only responded after about 2.5 hours, followed by the deeper sensors. Only when the deepest sensor moved was it clear that the water had reached 90 cm. The deeper the sensor and the drier the soil, the longer it takes.
Why that delay is useful
Dead time is not a flaw of the sensor, it is information. By looking at how long it takes and how deep the water gets, you learn how your irrigation behaves:
- The deepest sensor responds quickly and rises sharply? Then water is draining past the root zone: your irrigations are too long or too heavy. That wastes water, energy and fertilizer.
- The deepest sensor barely responds after a normal irrigation? Then the water stays in the top layer and you do not reach the deeper roots. Your irrigations may be too short.
- The middle sensor rises to around field capacity and then declines gradually? That is exactly what you want to see.
What this means for your interpretation
- Never judge an irrigation within the hour. Read the response a few hours after the irrigation, and for field capacity only after 12 to 24 hours.
- Irrigate before you reach the refill point, not after. If you wait until the sensor touches the refill point, the tree is already in early stress by the time the water reaches the roots. Factor in the delivery time.
- Look at the shape of the curve, not just the current value. A slow, steady decline shows the tree’s water use. Sharp peaks and dips point to irrigations that are too heavy and too infrequent. Lighter, more frequent irrigations (pulses) keep moisture in the root zone more stable.
Step by step: setting thresholds in 7 steps
- Measure at several depths (for example 30, 60 and 90 cm) under the drip line, in a representative zone or deliberately in the fastest-drying zone.
- Measure field capacity per depth: saturate, wait 12 to 24 hours, read.
- Determine the wilting point with a soil analysis or a reliable table value for your soil type.
- Calculate the refill point with a MAD of about 50% for fruit trees, and set that threshold in the portal, per depth and per field if the soil differs.
- Set the upper limit at field capacity, with a notification if soil moisture stays above it for a long time (saturation, oxygen shortage).
- Monitor a few irrigation events to learn your dead time, and move your irrigation moment to before the refill point.
- Refine during the season. Thresholds are a starting point. Adjust the allowable depletion for each phenological stage: critical periods such as cell division and fruit growth call for a smaller deficit and therefore tighter thresholds.
What this approach requires from your measuring system
- Objective %VWC across your soil types. Ask for independent validation against the gravimetric (oven-drying) method.
- Measuring at several depths. Almost indispensable for fruit trees.
- Your own thresholds per location and per depth. Without that, you cannot apply this method.
- The historical curve, not just the latest value. The insights are in the shape over time.
- A reliable wireless connection, even under dense foliage in a mature orchard.
Frequently asked questions about %VWC and thresholds
What does VWC mean for soil moisture?
VWC stands for volumetric water content: the share of a volume of soil that consists of water. 30% VWC means that 30% of the soil volume is water. A soil moisture sensor usually expresses its reading in %VWC.
What %VWC is ideal for fruit trees?
There is no universal ideal number, because it depends on your soil texture. Determine your own target zone between field capacity (measured 12 to 24 hours after saturation) and the refill point (field capacity minus about 50% of the available water). In the worked example in this article, that is 23 to 32% VWC.
What is field capacity?
Field capacity is the water content that remains after gravity has drained away the excess water. It is the upper limit of useful water. You measure it yourself by saturating the soil and reading the sensor 12 to 24 hours later.
How often should I irrigate with a soil moisture sensor?
Not on a fixed schedule, but when soil moisture approaches the refill point. Because of the dead time, it is best to irrigate just before you reach that point. Lighter, more frequent irrigations keep moisture in the root zone more stable than a few heavy ones.
At what depth should I install a soil moisture sensor for fruit trees?
Measure at several depths, for example 30, 60 and 90 cm, or at about one third and two thirds of the effective root depth, under the drip line. That way you see the working zone, the control zone and whether water drains below the roots.
Do I need to recalibrate the sensor for each soil type?
Not the sensor, as long as it measures %VWC correctly. The thresholds, yes: field capacity, wilting point and refill point shift with the soil texture, so set them separately per field and per depth.
From number to decision
A soil moisture sensor is not an automatic irrigation button. It is a measuring instrument that shows objectively how much water is in the soil. The gain lies in translating that into a decision: thresholds that match your soil type and crop stage, sensors at the right depths and irrigation timing that accounts for the time water needs to reach the roots. Then you no longer swing between “too little, to be careful” and “too much, to be safe”, but deliberately stay within the window in which your trees perform best.
In the PlantData.Live portal, you set your own thresholds per measuring point and per depth, and you get a notification when soil moisture approaches the refill point. Read how that works in irrigation control with soil moisture sensors, or see our approach to smart irrigation in fruit growing.
This article is a general guide. Specific thresholds, MAD percentages and irrigation decisions depend on your field, variety, rootstock, soil and climate. Validate them in your own crop.
Sources
Allen, R.G., Pereira, L.S., Raes, D. & Smith, M. (1998). Crop evapotranspiration: Guidelines for computing crop water requirements. FAO Irrigation and Drainage Paper 56. Rome: FAO. https://www.fao.org/4/x0490e/x0490e00.htm
Topp, G.C., Davis, J.L. & Annan, A.P. (1980). Electromagnetic determination of soil water content: measurements in coaxial transmission lines. Water Resources Research, 16(3), 574–582. https://doi.org/10.1029/WR016i003p00574
More from our knowledge base
How do you know whether your soil moisture sensor is still measuring correctly?
Spotting faulty or drifting sensors in the data.
Why dendrometry reveals water stress
How the trunk reveals stress before visible damage appears.
Regulated deficit irrigation: smart irrigation
Targeted water savings without yield loss.